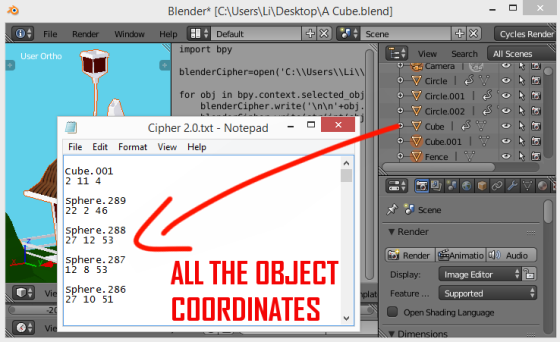
So you want to get a text file with the coordinates of all the objects in a Blender scene? Luckily, Python has some wonderful built-in functions that can do exactly that.
Continue reading “Python: How to Put Blender Data into a Text File”

For the genuinely confused.
So you want to get a text file with the coordinates of all the objects in a Blender scene? Luckily, Python has some wonderful built-in functions that can do exactly that.
Continue reading “Python: How to Put Blender Data into a Text File”

I like shift ciphers as much as the next guy but Caesar is just so damn obvious. If you’re sending a giant wall of nonsense letters to a friend in an email, you might as well wave a giant neon-colored flag around that says “HEY I’M A SHADY BASTARD” to any third parties that might stumble upon it.
A proper cipher should have some form of camouflage. Like a sweet little house on a hill. With fireflies hanging out.

Yet another way in which Python is magic—this scene of exploding lights would have taken me hours to model if I was manually, painstakingly inputting keyframes for every object.
Python can do it in less than 2 minutes.

Modeling randomness in Blender can be frustrating. But once I figured out I could use Python to generate random numbers, it got a lot easier.
For this week’s project, I made 200 lights around my little bug using a simple loop, some variables, and a Python module.
Continue reading “Python: How to Make Hundreds of Random Lights in Blender”
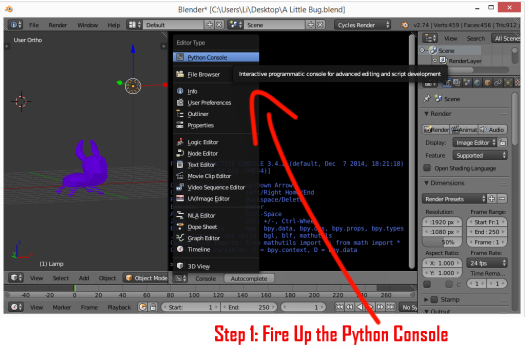
Ok, let’s start up by opening up the Python Console. Go to your Editor Type selector, and it’ll be the first option that pops up.
Continue reading “Python: How to Start Scripting in Blender”
So you wanna prettify your user interface? Maybe make some custom buttons and use your own image instead of the default grey box on the left?
It’s actually not as difficult as I was expecting. All you need is a program like Photoshop or Gimp to make the .png, .jpg or .tif for your background and any buttons.
Continue reading “AHK: Making a User Interface with Graphics”
So Hopper’s Amazing Decipherer Script 1.0 was about 472 lines because it included ELSE IF clauses for every letter in the alphabet.
HADS 2.0 cuts it down to 77 lines because arrays, as it turns out, are incredibly useful when paired with loops.
Deciphering a Caesar cipher requires that the alphabet be moved up by a certain number. Like so.

Notice that this is basically a 2-step process. Turn the letters of the alphabet into numbers 1-26. Then add the rotational value to each of them to find their new positions, in the code below that’s assigned to a variable called indexVar. In ROT1, A =1 and the rotational value is 1, so A = 1+1 = 2.
But what happens when you hit Z? Z=26 and the rotation is 1, so Z = 26+1 = 27.
So, you want to tell the computer IF the number goes above 27, then you want to reset it to 1 and continue.
Arrays are a damn godsend. More specifically, they’re an easy way to deal with large lists. Why is this useful you ask? Imagine you want to run the same code on multiple items. The items could be numbers, letters, words, full sentences—anything. By putting those things in a list, or an array, you can loop through hundreds, even thousands, of items with just a few lines of code.


VG JNF N OEVTUG PBYQ QNL VA NCEVY NAQ GUR PYBPXF JRER FGEVXVAT GUVEGRRA JVAFGBA FZVGU UVF PUVA AHMMYRQ VAGB UVF OERNFG VA NA RSSBEG GB RFPNCR GUR IVYR JVAQ FYVCCRQ DHVPXYL GUEBHTU GUR TYNFF QBBEF BS IVPGBEL ZNAFVBAF GUBHTU ABG DHVPXYL RABHTU GB CERIRAG N FJVEY BS TEVGGL QHFG SEBZ RAGREVAT NYBAT JVGU UVZ
-No idea what this says. Damn you, Caesar.
The Caesar Shift is supposed to be ridiculously easy to decipher. I say supposed to be because while it might be easy to crack, translating the bastard is mind-numbingly painful if you have a substantial block of text.
There are quite a few resources online that’ll do it for you, but for kicks, I wrote an AHK that automates it—if you know how many positions you want to shift.
Continue reading “AHK: How to Decipher the Caesar Shift with Code”
Need to make changes to every pixel in an image? As it turns out, that’s not so difficult with AutoHotkey. From what I’ve been able to gather, all you really need is the height and width of the picture so that the loop knows how many times to run and the XY coordinates of the picture’s upper left corner.
Note that CoordMode, Pixel, Screen tells the computer to use the XY coordinates relative to the screen rather than the window.
CoordMode, Pixel, Screen
Height:=Height of the Image
Width:=Width of the Image
Xaxis:=X-Coordinate to start at
Yaxis:=Y-Coordinate to start atloop, %Height%
{
loop, %Width%
{Do This Code, Xaxis, Yaxis
Xaxis++
}
Xaxis:= Xaxis-Width
Yaxis++
}
